介绍 目前手中有三台NAT后的设备,其中一台有内网穿透的需求,于是选择frp作为内网穿透工具,以便另外两台设备在外网访问。使用nginx对内网穿透的流量进行转发和过滤满足安全需求,使用docker-compose对nginx和frp服务进行编排。
📍项目地址
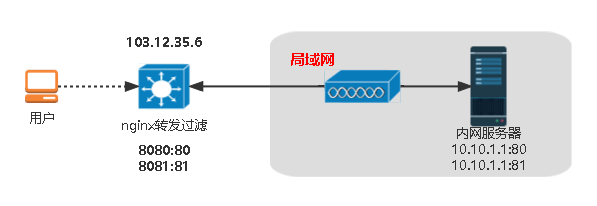
拓扑结构 因为只有一台设备,所以拓扑结构非常简单,如下对内网服务器提供的80和81服务进行转发。
frp服务配置 frp is a fast reverse proxy to help you expose a local server behind a NAT or firewall to the Internet. As of now, it supports TCP and UDP, as well as HTTP and HTTPS protocols, where requests can be forwarded to internal services by domain name.
frp 是一个专注于内网穿透的高性能的反向代理应用,支持 TCP、UDP、HTTP、HTTPS 等多种协议。可以将内网服务以安全、便捷的方式通过具有公网 IP 节点的中转暴露到公网。
frp服务端 根据官方文档,可以通过配置frps.ini对服务端进行配置,比如服务端口和身份认证,下面是可以参考的基础配置。
1
2
3
[common] bind_port = 7000 token = c4bf92d681
上面配置文件的common块中配置了最基础的服务端口和认证口令,认证口令可以防止服务被恶意使用。还有更多地配置项可以参考frp文档 。
frpc 根据我们的拓扑和服务端配置,公网转发服务器IP为103.12.35.6,故客户端配置文件可配置如下。客户端的配置文件frpc.ini分为两部分:服务端信息和需要转发的端口信息。
1
2
3
4
5
6
7
8
9
10
11
12
13
14
15
16
[common] server_addr = 103.12 .35.6 server_port = 7000 token = c4bf92d681[tcp_80] type = tcplocal_ip = 127.0 .0.1 local_port = 80 remote_port = 8080 [tcp_81] type = tcplocal_ip = 127.0 .0.1 local_port = 81 remote_port = 8081
需要修改server_addr为远程frps服务器的IP地址,local_port是NAT设备Web服务的端口,remote_port是映射在服务器上的端口。以上的配置文件只演示了tcp服务的穿透,可以根据自己的需求配置。比如对ssh端口进行转发。这里 是官方提供的例子。
安全需求 frp提供了两种客户端认证方式:Token认证和OIDC认证。
Token认证 在上面的配置中,使用的就是Token认证,需要在服务端和客户端的配置文件下的common块中配置token = *密钥*即可。
OIDC认证 使用OIDC认证需要在服务端和客户端的配置文件下的common块中指定认证方式为oidc。
frps配置文件参考 1 2 3 4 [common] authentication_method = oidcoidc_issuer = https://example-oidc-issuer.com/oidc_audience = https://oidc-audience.com/.default
frpc配置文件参考 1 2 3 4 5 6 [common] authentication_method = oidcoidc_client_id = 98692467 -37 de-409 a-9 fac-bb2585826f18 oidc_client_secret = oidc_secretoidc_audience = https://oidc-audience.com/.defaultoidc_token_endpoint_url = https://example-oidc-endpoint.com/oauth2/v2.0 /token
参数说明
类型
描述
authentication_method
身份验证方式,token 或 oidc,默认为 token。
authenticate_heartbeats
在每一个心跳包中附加上身份认证信息,客户端服务端需要一致。
authenticate_new_work_conns
在每次创建工作连接时附加上身份认证信息,客户端服务端需要一致。
frp下载 可以到frp版本发布页下载 ,选择并下载适合自己平台的版本。在下载的压缩包中包含了服务端和客户端的所有文件,以linux_amd64为例,目录结构为:
1 2 3 4 5 6 7 8 . ├── LICENSE ├── frpc ├── frpc.ini ├── frpc_full.ini ├── frps ├── frps.ini └── frps_full.ini
容器编排 本节使用docker-compose编排frps和nginx,完成对流量的转发和过滤。
文件结构 1 2 3 4 5 6 7 8 9 10 11 12 13 14 15 16 17 18 19 20 . ├── README.md ├── docker-compose.yml ├── frps │ ├── Dockerfile │ └── conf │ └── frps.ini └── nginx ├── Dockerfile ├── conf │ ├── firewall_conf │ │ └── firewall.conf │ ├── nginx.conf │ └── tcp_conf │ ├── tcp7000.conf │ ├── tcp8080.conf │ └── tcp8081.conf ├── logs └── templates └── index.html
docker-compose编排文件 1 2 3 4 5 6 7 8 9 10 11 12 13 14 15 16 17 18 19 version: "3.5" services: frps_app: container_name: frps_server restart: always volumes: - ./frps/conf:/etc/frp build: ./frps nginx_app: container_name: nginx restart: always build: ./nginx volumes: - ./nginx/logs:/var/nginx/logs ports: - "7000:7000" - "8080:8080" - "8081:8081"
frps容器配置 目录结构 在Dockerfile中配置frps镜像,conf/文件夹中放置配置文件。
1 2 3 4 frps/ ├── Dockerfile └── conf └── frps.ini
Dockerfile nginx容器配置 Nginx是一款轻量级的Web服务器、反向代理服务器,由于它的内存占用少,启动极快,高并发能力强,在互联网项目中广泛应用。
目录结构 1 2 3 4 5 6 7 8 9 10 11 12 13 nginx/ ├── Dockerfile ├── conf │ ├── firewall_conf │ │ └── firewall.conf │ ├── nginx.conf │ └── tcp_conf │ ├── tcp7000.conf │ ├── tcp8080.conf │ └── tcp8081.conf ├── logs └── templates └── index.html
nginx这本文场景中除了对流量进行转发,还在80端口提供了html服务。在conf/文件夹中放置了流量过滤和转发的配置文件,流量过滤目前只对国外流量进行了过滤。
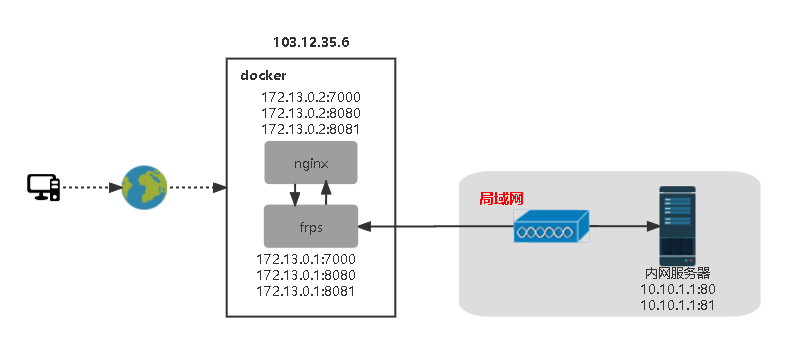
编排后的网络拓扑 下图是经过容器编排后的网络拓扑结构。
其中172.13.0.0/24段是frps和nginx两个容器所在网段。通过docker-compose端口映射将通过nginx转发的frps服务端口和内网服务器映射到该服务器上的两个内网端口映射到拥有独立IP的云主机上。
1 2 3 4 ports: - "7000:7000" - "8080:8080" - "8081:8081"
nginx配置文件 1 2 3 4 5 6 7 8 9 10 11 12 13 14 15 16 17 18 19 20 21 22 23 24 25 26 27 28 29 30 31 32 33 34 35 36 37 38 39 40 41 42 43 44 45 46 47 48 49 50 51 52 worker_processes auto; events { worker_connections 1024 ; }stream { log_format proxy '$remote_addr [$time_local ] ' '$protocol $status $bytes_sent $bytes_received ' '$session_time "$upstream_addr " ' '"$upstream_bytes_sent " "$upstream_bytes_received " "$upstream_connect_time "' ; access_log /var/nginx/logs/tcp-access.log proxy ; open_log_file_cache off ; include tcp_conf/*.conf ; } http { include mime.types; default_type application/octet-stream; sendfile on ; tcp_nopush on ; autoindex off ; server_tokens off ; gzip on ; gzip_min_length 1k ; gzip_buffers 4 16k ; gzip_http_version 1 .1 ; gzip_comp_level 4 ; gzip_types text/plain application/x-javascript text/css application/xml text/javascript application/x-httpd-php image/jpeg image/gif image/png; include firewall_conf/firewall.conf; server { listen 80 ; server_name localhost; access_log /var/nginx/logs/access-80 .log; location / { if ($http_user_agent ~* wget|curl|scrapy|okhttp|httpclient|java|python|go) { return 444 ; } root /var/www/static; index index.html index.htm; add_header X-XSS-Protection '1; mode=block' ; limit_except GET { deny all; } } } }
upstream配置 在nginx的配置文件目录下新建tcp_conf/,并编写需要配置的80和81的配置文件。
1 2 3 4 5 6 7 8 9 10 11 upstream tcp7000 { server frps_app:7000 ; } server { listen 7000 ; proxy_connect_timeout 8s ; proxy_timeout 24h ; proxy_pass tcp7000; }
1 2 3 4 5 6 7 8 9 10 11 upstream tcp8080 { server frps_app:8080 ; } server { listen 8080 ; proxy_connect_timeout 8s ; proxy_timeout 24h ; proxy_pass tcp8080; }
1 2 3 4 5 6 7 8 9 10 11 upstream tcp8081 { server frps_app:8081 ; } server { listen 8081 ; proxy_connect_timeout 8s ; proxy_timeout 24h ; proxy_pass tcp8081; }
Dockerfile 1 2 3 4 5 6 7 8 9 10 11 12 13 14 15 16 17 18 19 20 21 22 23 24 FROM nginxENV TimeZone=Asia/ShanghaiWORKDIR /etc/nginx/ RUN cp nginx.conf ./nginx.conf.bak COPY ./conf/nginx.conf ./ CMD mkdir tcp_conf CMD mkdir firewall_conf COPY ./conf/tcp_conf/* ./tcp_conf/ COPY ./conf/firewall_conf/* ./firewall_conf/ CMD mkdir -p /var/www/static WORKDIR /var/www/static COPY ./templates/index.html ./index.html CMD ["nginx" , "-g" , "daemon off;" ] EXPOSE 80 EXPOSE 7000 EXPOSE 8080 EXPOSE 8081
结语 项目写的比较潦草,希望和大家多交流,感谢。
参考链接
frp文档 项目地址